> ## Documentation Index
> Fetch the complete documentation index at: https://knowledge.goautonomous.io/llms.txt
> Use this file to discover all available pages before exploring further.
# Microsoft Connector Guide
> Connect Go Autonomous to Microsoft to source emails from your organisation's inboxes.
## Before you start
* The connector is a Microsoft-validated integration from Go Autonomous, a Microsoft Partner. It sources emails in the background — it won't disrupt end-user workflows.
* Microsoft authentication requires an IT representative with **Azure Active Directory admin rights**.
* Setup typically takes around three minutes. After permissions are granted, allow up to ten minutes for the connector to appear on the Go Autonomous platform.
* Once available, inbox selection can be completed without further IT involvement.
***
## Set up security groups
Requires Microsoft Azure AD admin rights.
Your organisation may restrict application access to mailboxes before the connector is activated. Use Microsoft's application permission controls to limit which mailboxes Go Autonomous can access.
* [Official Microsoft guide: limit application permissions to specific Exchange Online mailboxes](https://learn.microsoft.com/en-us/graph/auth-limit-mailbox-access)
* [Microsoft Admin Center — set up security groups](https://admin.microsoft.com/Adminportal/Home)
**Go Autonomous application IDs by environment:** see [Application IDs](/knowledge-base/administration/connectors/ms-connector/application-ids) for the IDs to use when restricting mailbox access.
***
## Enable the Microsoft connector
Requires Microsoft Azure AD admin rights and Go Autonomous admin rights.
Navigate to [my.goautonomous.io](https://my.goautonomous.io) and enter the credentials provided by your Go Autonomous Success Manager.
Click the menu button in the upper right corner of the screen and open **Company Settings**.
Navigate to **Connectors** and click the **Microsoft** connector under **Add connection**.
A standard Microsoft authentication prompt will appear. Enter your Microsoft admin credentials. Microsoft handles all credential processing — Go Autonomous does not have visibility into them.
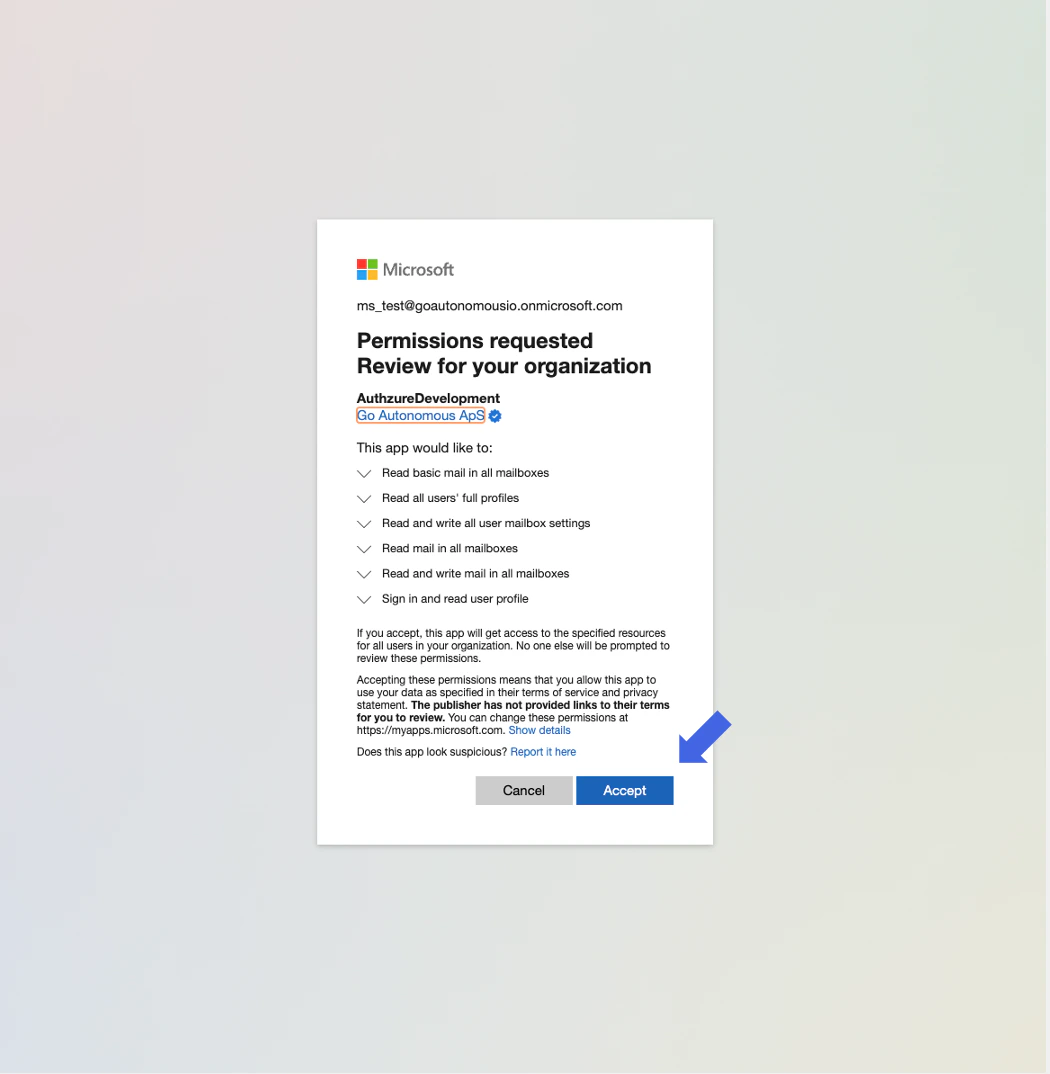 Click **Accept** to authorise the connector. You will see a **Success!** confirmation screen.
 Navigate back to **Connectors**. The Microsoft connector should now appear under your active connections. Allow up to 10 minutes after granting permissions for it to appear.
***
## Set up inbox sourcing
Requires the Microsoft connector to be activated (Part B) and Go Autonomous admin rights.
Navigate to **Administration > Company Settings > Connectors** and click the established Microsoft connector.
Select the inboxes you want to source emails from. Only new incoming emails will be sourced — emails already present in the inbox at the time of connection will not be processed.
***
## Troubleshooting
Check that the following requirements are met:
* The inbox is part of a security group created in Part A.
* The inbox name is spelled exactly as it appears in Azure Active Directory (including upper and lower case).
* If the inbox has aliases, try searching for those as well.
Check whether incoming emails are being automatically moved by Outlook to a subfolder of the inbox. Go Autonomous sources from the root inbox only.
## SSO and user access
Setting up the Microsoft connector also establishes the **SSO connection** between Go Autonomous and your Azure tenant. From this point, users sign in to Go Autonomous with their Microsoft credentials.
Once SSO is in place, you control **who can access Go Autonomous** directly from Azure — by managing access to the Go Autonomous Enterprise Application in your Azure user groups. Anyone you assign to the application can sign in; anyone you remove loses access.
### Sync user groups to control in-platform privileges
You can take this one step further and sync Azure user groups into Go Autonomous so that **what users can do** inside the platform is also driven from Azure. When a user signs in for the first time, their group membership in Azure determines the user groups (and therefore the permissions) they inherit on the platform — no manual provisioning needed.
* [User Groups](/knowledge-base/administration/access-control/user-groups) — how user groups work in Go Autonomous and what each group controls.
* [Setting up SCIM](/knowledge-base/administration/access-control/scim) — sync user groups from Azure (Microsoft Entra) into Go Autonomous via SCIM.
* [User Management](/knowledge-base/administration/access-control/user-management) — see synced users and their effective permissions.
## What's next
* [Application IDs](/knowledge-base/administration/connectors/ms-connector/application-ids)
* [Set up mirror inboxes](/knowledge-base/administration/connectors/ms-connector/mirror-inboxes)
* [Install the Outlook plug-in](/knowledge-base/administration/connectors/ms-connector/outlook-plug-in)
* [User Groups](/knowledge-base/administration/access-control/user-groups)
Navigate back to **Connectors**. The Microsoft connector should now appear under your active connections. Allow up to 10 minutes after granting permissions for it to appear.
***
## Set up inbox sourcing
Requires the Microsoft connector to be activated (Part B) and Go Autonomous admin rights.
Navigate to **Administration > Company Settings > Connectors** and click the established Microsoft connector.
Select the inboxes you want to source emails from. Only new incoming emails will be sourced — emails already present in the inbox at the time of connection will not be processed.
***
## Troubleshooting
Check that the following requirements are met:
* The inbox is part of a security group created in Part A.
* The inbox name is spelled exactly as it appears in Azure Active Directory (including upper and lower case).
* If the inbox has aliases, try searching for those as well.
Check whether incoming emails are being automatically moved by Outlook to a subfolder of the inbox. Go Autonomous sources from the root inbox only.
## SSO and user access
Setting up the Microsoft connector also establishes the **SSO connection** between Go Autonomous and your Azure tenant. From this point, users sign in to Go Autonomous with their Microsoft credentials.
Once SSO is in place, you control **who can access Go Autonomous** directly from Azure — by managing access to the Go Autonomous Enterprise Application in your Azure user groups. Anyone you assign to the application can sign in; anyone you remove loses access.
### Sync user groups to control in-platform privileges
You can take this one step further and sync Azure user groups into Go Autonomous so that **what users can do** inside the platform is also driven from Azure. When a user signs in for the first time, their group membership in Azure determines the user groups (and therefore the permissions) they inherit on the platform — no manual provisioning needed.
* [User Groups](/knowledge-base/administration/access-control/user-groups) — how user groups work in Go Autonomous and what each group controls.
* [Setting up SCIM](/knowledge-base/administration/access-control/scim) — sync user groups from Azure (Microsoft Entra) into Go Autonomous via SCIM.
* [User Management](/knowledge-base/administration/access-control/user-management) — see synced users and their effective permissions.
## What's next
* [Application IDs](/knowledge-base/administration/connectors/ms-connector/application-ids)
* [Set up mirror inboxes](/knowledge-base/administration/connectors/ms-connector/mirror-inboxes)
* [Install the Outlook plug-in](/knowledge-base/administration/connectors/ms-connector/outlook-plug-in)
* [User Groups](/knowledge-base/administration/access-control/user-groups)